How to Make PVC Wind Generator Blades?

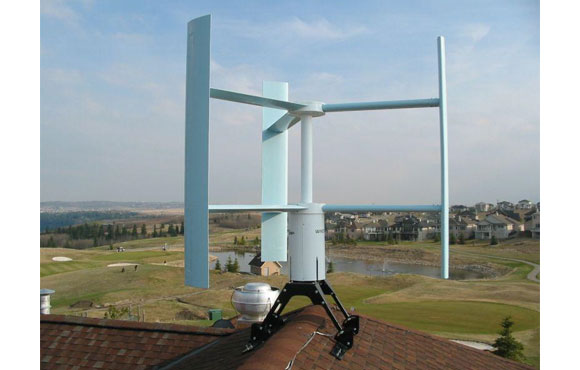
The PVC generator blades are becoming more and more popular with domestic and homemade wind generators. It is quite easy to find raw PVC materials as they are relatively cheap. Even then, making the right blades from the PVC materials is the most challenging part of creating own wind generator. This is because the blades have to get exposed to very high stress when producing energy. To ensure that the blades withstand destructive vibrations, they must be made with high tolerances.

Why you need PVC for your wind generator blades?

First, PVC pipes are easily available and they are cost effective thus can be replaced easily upon damage. Secondly, the PVC materials are highly flexible thus reducing the risk of frequent damage as well as prevent wind turbines from over spinning. Lastly, they PVC pipes are easy to work with as lesser energy is required to cut them into the blade shapes that you may require. To make the best out of the PVC materials used to make blades, ensure that they are of the right thickness to ensure that the blades once created do not bend too much to hit the turbine mast.
PVC Wind Generator Blades

How to make PVC wind generator blades?

1.) First, assembly all the tools you may need during the actual procedure. Then, measure the PVC pipe's circumference; you can use either a paper or a string to do that. Then, measure the pipe's length using a tape measure. Then, using the length measurements, divide the pipe into equal parts. You can decide to come up with four pieces. If your pipe measured say 16 inches and you need 4 pieces it means that each piece will be 4 inch long.
2.) Then using the tape measure again the pipe four times to show where the cuttings are to be made
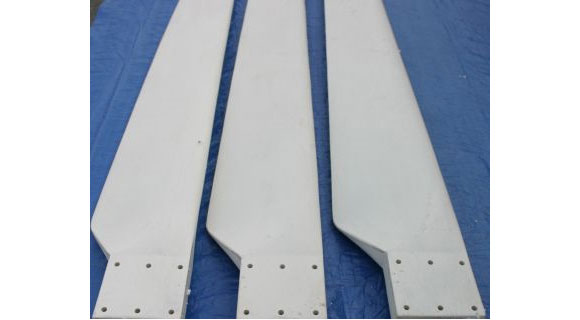
3.) Next, wrap the pipe at one edge with a strip of paper that then make four marks around the paper to cover the circumference of the pipe. Armed with your hacksaw or jigsaw cut the pipe lengthwise using the marks you had previously made. Repeat this until you get the four pieces you had bargained for when you were marking the pipe. At the end of it all, you expect to come up with four pieces that have equal lengths, curvature and widths.
4.) Then from one corner of the four pieces, cut off about 2 inches and you will remain with a portion that is stable to mount the blade.
5.) Then starting from the corner that is on the opposite side of the cut corner, mark two inches. Next, create a straight line diagonally crossing the pipe from the place you marked to the other end of the pipe. Repeat this procedure for the other three pieces. On every pipe cut along the diagonal marks you made. With this, you will end up with triangular pieces that offer the windmill blade shape.
6.) Then, sand the blades to do away with the rough edges. Do this until all the four blades have smooth surfaces. With this, you will be ready to install into your wind generator. To create the surface, you will either need to bolt or screw the blades onto a hub preferably made of plywood. Alternatively, you can decide to use a car radiator fan and screw the blades onto the fan.
You may be required to coat the pieces with paint that is UV protective before installing the blades. Although the majority of PVC materials are strong enough to withstand a number of conditions, long exposure to UV rays will make them become brittle. The paint will ensure that the PVC material does not become brittle after some time of usage.

Decomposers and Detritivores in the Energy Pyramid

In order for a natural ecosystem to be balanced there is need for three types of organisms; producers, consumers and decomposers. Producers are groups of organisms that make organic compounds out of inorganic ones. They include green plants that use energy from the sun to make their own food. Consumers get their nutrients from feeding on other organisms.
Decomposers help in converting the leftovers of animals and plants to useful substances for other living organisms. They are mainly bacteria and fungi. Have you ever wondered what would happen if the decomposers and consumers were not in the ecosystem?
Detritivores play a very important in the cycle as they are the consumers of dead leaves, old skin, carcasses and manure. They include millipedes, earthworms and slugs that feed on dead plants and animals but leave some parts and their feces that are converted to energy by the decomposers. Players in the energy cycle function hand in hand, a decomposer is found at the lowest part of the cycle as it deals with the remains. They complete the energy cycle. The roles of the decomposers and detritivores almost coincide.

Detritivores

Detritivores improve the nutritional value and the texture of the soil: This makes the soil productive to plant life which translates to availability of food for the herbivores and carnivores like human beings. They however do not complete the energy cycle as their wastes are energy products that need to be decayed. Consumers may eat an animal or plant but it will leave some amount of energy in form of fur and bones.
Get rid of dead organisms: They feed on dead organisms both plants and animals. They assist in ridding the environment of remains of organic material.
Decomposers and Energy

Decomposers

Decomposers actually help in the process of decay: They convert what is left by the detritivores that is the wastes and leftovers of bones and fur. This is converted to carbon dioxide used by plants for making its own food.
This is an indirect contribution to the provision of oxygen used for breathing. Plants take in carbon dioxide during photosynthesis and release oxygen which is essential for the lives of animals.
Adding nutrients to the soil: Decomposers break down non usable compounds in the air like magnesium and nitrogen into simple elements that can be used by plants or absorbed into the soil. These broken compounds enrich the soil increasing the chances of survival of plant life.
They keep the environment clean and healthy: Decomposers help in decay and conversion of remains of plants and animals to carbon dioxide and energy. This means that if decomposers were not there in the ecosystem we might have to cope with the stench that comes from overstayed dead parts of animals and plants like bones and leaves in the surrounding.
Generally, decomposers are the most recognized players in the food chain as well as the energy pyramid. They are the only other players that have direct access to the energy stored in plants that comes from direct sunlight. The other player is the herbivore which feeds on living plant life. The herbivores are known to consume only 10% of the energy in plants while the rest is consumed by decomposers who consume dead plants.
The decomposers do not share the energy with any members of the ecosystem but is transferred to the soil when they die or is taken away by the organisms that eat them. It is clear that survival would be difficult if the food chain lacked decomposers and detritivores. The energy cycle would not continue as the energy would be lost after the death of plants and animals.

Grid Tie Inverters for Solar Energy

Having a solar system at home to convert sunlight into electrical power for domestic use is very beneficial to a person in several ways. Apart from having an uninterrupted power supply that is very much reliable, you get to save costs that would be used to foot electricity bills thus an appropriate source of power.
Connecting the solar to a power grid is one of the most common ways of configuring it at home because it ensures surplus power does not go into waste as well as producing extra power when the sunlight levels are low and at night when there is completely none. Owing to the benefits it comes with, this article will take you through the main steps of wiring grid tieinverters for solar energy at home to ensure you do not seek professional help when installing yours.

Getting Tools of Trade Ready

To begin with, you will be required to have all the necessary materials and equipment for wiring well in place and in advance. Make sure the solar panels, combiner box, direct current breaker box, grid disconnects and power inverter is ready and in good working condition. Once all that is ready, wire each string of the solar panels into the combiner box and make sure the circuit breakers are also in place. The number of solar panels you are using will determine the type of box and size of breakers that you require and this is vital for consideration to ensure you do not use wrong ones.
At the exact point where cables running from the panels enter the house install the direct current disconnect switch and then fix a metal oxide variator to the point where connections from several devices meet. This will be helpful in preventing circuits from any effects occasioned by excess currents or voltage thus minimizing chances of fire outbreaks in case of faults within the electrical system.
You can then install the breaker box which plays the role of a cutoff point because it acts swiftly to open the circuits whenever power leakages are detected. Do the same to the power inverter and this is important since it changes direct current that comes from the solar panels into alternate current which is the most common one in many homes. This furthermore makes sure the voltage of the current that comes from the panels is neutralized in a way that it is well suited for use with all the electrical apparatus like iron box, TV, radio and heaters you have.
Grid Tie Inverter
Since there are times when you will not be willing to use the power or it is not necessary at all you will have to install the main service disconnect. This will enable you to cut the power supply between the system powered by the grid and the solar panels when not in use. Once you are through with all that, it is time to connect the main device disconnect to the power grid meter as well as the distribution panel. You will have tied together the solar system, utility lines and the power outlets in your house to enjoy uninterrupted power supply for free.

Caution while Wiring Your Grid Tie Inverters

Solar energy can be very dangerous like normal electricity especially when there are a lot of sunlight therefore you have to be extra careful when making the connections. Never leave any cables naked and seek advice from a qualified and experienced electrician before doing connections to avoid making wrong configurations. Also, take note that the entire system is connected together and the failure of one will lead to the failure of the rest which means you have to be cautious when using any.

How to Build a Vertical Axis Wind Turbine?

There are various parts which are required to build a vertical axis wind turbine and below those are mentioned:

Parts Needed for Building the Vertical Axis Wind Turbine

Jigsaw and or band saw, a hand saw, a lathe, a drill press or hand drill, some drill bits, screwdriver, tab tool, a ruler, a pencil, compass, sanding paper, vise (it's meant to make work easier), wrenches, and 2 clamps. Then you may need some parts for this process which are a PVC pipe, waterproof wood "the concrete plywood is most advisable.
However, in the event you don't have one then you may be required to protect the plywood using a coating, 2 bearings and it is important to note that the one at the bottom will require to be firm to hold a load, a grease nipple, a wire rod in two sizes or 1 big one and some four small ones otherwise stainless steel is the best, have some bolts and washers in two sizes still the stainless steel is the best, get a piece of 40 mm round aluminum or its alloy such that it can handle a load, find two angle irons and three eye screws.
Vertical Axis Wind Turbine

Steps on How to build the Vertical Axis Wind Turbine (VAWT)

  • First and foremost you will need to measure the PVC pipe which you will divide it into four equal parts using one of the saws. Then still cut it over through the whole length which should result into 8 equal size pieces.
  • The next step is take your two pieces of the waterproof plywood which should be 12mm then measure them in two directions whereby you mark the point from the middle of your plate. After which you take the compass and then draw a 40cm diameter circle. Then using your jigsaw to cut the plywood out.
  • The next step is to ensure that take the one of the half pipes then hold them against the 8 lines you had drawn previously. Ensure that you draw one line on the inside the circles and another one on the outside in a way you will make small bows of which you will have to clamp the bows together. Then cut them into equal pieces whereby you make a marking that runs over sides the two disks. This is meant to ensure that the turbine disks are lined up impeccably. In addition, ensure that the clamped disks are drilled to fit in the size of the big wire rod into the whole and then drill the four holes which are meant for the small rods. Then divide the four rods in similar sizes over the turbine ensuring that you stay 2cm from your bows. This will ensure that the washers do not come into contact with your blades.
  • The next step is that you place the turbine on top the same way you did at the bottom. Be keen on the markings that you had on the disks sides as they were still clamped. Then ensure that the cuts fit on top of each in a nice way as this will ensure that the turbine will not wobble as much after you are done. You can use a small piece of wood and hammer to reduce the risks of damaging the blade once you start hitting them. Also ensure that the blades fit in tightly and the little rods are in their right places.
In other terms, it may not be easy to build a VAWT but it will require understanding the instructions and if possible visit a website that will have all the right images to assist in making the bow cuts and finally having the wind turbine. It is important to note that most of the turbines require precise measurements that will assist in making the turbine having a more sturdy structure and get efficient.

Multifunctional Biomass System

Biomass is known to play a big role in mitigating greenhouse gas emissions by supplyingbiomass based fuels. Low share of biomass application in many parts of the globe is eminent, and this is attributed to the high production costs and low availability of agricultural land where efficient biomass energy can be produced.
However low costs biomass production routes have been developed so that enough biomass energy is produced and put into useful purposes. One of the low costs production costs that has proven to be very effective and quite beneficial is the multifunctional biomass system. The system uses the concepts of multi- product use and cascading to produce the desired energy and for different applications within the home. Cascading refers to the use biomass in recycling of materials and energy recovery.
One of the vital parameters of multifunctional biomass systems is that, they offer chances for great savings of the nonrenewable energy consumption, greenhouse gas emission reduction, and saves on costs of agricultural land use and the total cost of multifunctional biomass system. The potential of the system to improve the costs is carried out in quantitative terms which are divided into two major aspects.
Aspects on how multifunctional biomass system saves on costs of land use, gas emissions and non-renewable energy consumption
One of the most important aspects that shows how multifunctional biomass system saves or improves on the costs of these applications, is the methodology to account for land use, greenhouse gas emission, nonrenewable energy consumption which are adapted for evaluation of the multifunctional system. It involves taking into account the time dimension and the integration of market prices which often change from time to time.
Multifunctional Biomass System
The environmental impact of biomass and system expansion are given special attention because, there is a positive impact on the environment which means that less money is involved in energy conversion systems. The other potential benefit largely depends on the kind of biomass system used. Good research needs to be carried out so that a profitable multifunctional biomass system is used, to help in fast and efficient energy production that is very useful.

Quantitative benefits of multifunctional biomass-refinery system

Multifunctional biomass-refinery system is largely used in the production of biomass energy. This includes the use of agricultural residues for energy production and the use of waste to energy for recovery. The level of systems performance in carrying out these tasks is quite exceptional and it doesn't take a lot of time and energy to produce the desired energy. This means that a fast energy production involves low costs of production in terms of the materials used per kilogram, which saves on production costs and land use. The market prices of and land may be high but since the system can operate faster, less materials and products and the products which are used are maximized so that they can produce the desired energy.
All bio-refinery multifunctional biomass systems can offer net savings of non-renewable energy consumption of 70 to 220 GJ per hectare every year, and net savings on greenhouse gas emissions of 3 to 17 mg every year per hectare. These are great net benefits that the system offers and that is why it is very important to ensure proper viability of biomass system, for increased production of energy and more opportunities for savings.
Multifunctional biomass should also be introduced on large scale so that good own price elasticity is achieved because, high demand of energy production materials affect the overall costs of biomass refinery system. With large scale introduction of biomass material, then there will production of an energy which can be used for various applications within and outside the house.

How to Build a Solar Power Windmill?

With the harsh economic period that is being witnessed in the entire world, it is important that you derive ways in which to handle this situation. It is believed that human activities have greatly contributed to the economic crisis as well as to the harsh climate conditions that have caused unpredictable weather conditions. This is because these human activities affect the environment thus to reduce these effects, it is good to consider some of the activities that are harmful. One such way to protect the environment is to use solar power windmill. This is possible in that it will save lots of energy as well as costs. It is possible to build solar panel on your own.

How to Build a Solar Power Windmill?

The first thing that you need to do is to plan your system. Here are some ways to attain this;
You need to plan your system: This is the initial step when it comes to building a solar power windmill. In this step, you need to know how much energy you consume on daily basis or per month and also look at the monthly bills. You also need to cut wasting electricity in that you have to switch off lights when not in use also ensure some of the electronics in your house are put on power strips. You the need to add the entire wattage used on daily basis and also the amount that is used by your appliances. This is advised in that you will know the exact output of solar power windmill that you need in your home.
With this information, you need to research the market so as to find out the available solar power windmills as well the price. In this case, look at the features of these windmills such as battery durability which is important in that it will help establish the amount of energy that will be saved. Consider a battery that saves energy in at least two consecutive days.
You also need to evaluate solar output as well as the wind speed. This in most cases has to be done with the location in mind. Consider the wind turbines diameter so as to know the right turbine and solar to opt for. You can decide to purchase a kit or Build a Solar Power Windmillon your own. This is a decision that you need to regard.
Windmill and Sun

Putting together the items

  • After you have determined what you need and shopped for the right products, it is time to build a Solar Power Windmill.
  • You need to install the solar panels on a designated place on your roof. This place should be where the sun hits so much. Consider the southwest facing side.
  • Erect windmill tower in a location where wind can easily reach the turbine blades without any form of hindrances from the environment. In order to boost performance, it is good to raise the tower.
  • Fix the turbine to the tower and during this process, ensure that the blades are of adequate length and that they have been pitched so as to catch prevailing wind and enhance free turning.
  • You then have to attach the windmill to a generator or alternator which is mandated to change wind power into electricity.
Finally, you have to wire the solar panels, generator as well as the battery to the electrical system. You need to be aware that the solar panels that you will install only generate electricity when light strikes onto them hence the amount of energy produced can vary from time to time. In case of temperature change, production of electricity will also be affected.

Share

Twitter Delicious Facebook Digg Stumbleupon Favorites More